
For my son’s Spider-Man birthday, I wanted a New York City–inspired menu that was fun for kids, easy on the host, and recognizable to guests of all ages. I kept the mains classic—pizza, Nathan’s hot dogs, and deli sandwiches—and rounded it out with bagels, cookies, and simple skyline décor. It was inexpensive, beginner-friendly, and the food practically cooked itself while I hosted.
Want the exact tools I used? I’ve linked them throughout the post so you can copy this setup at home.
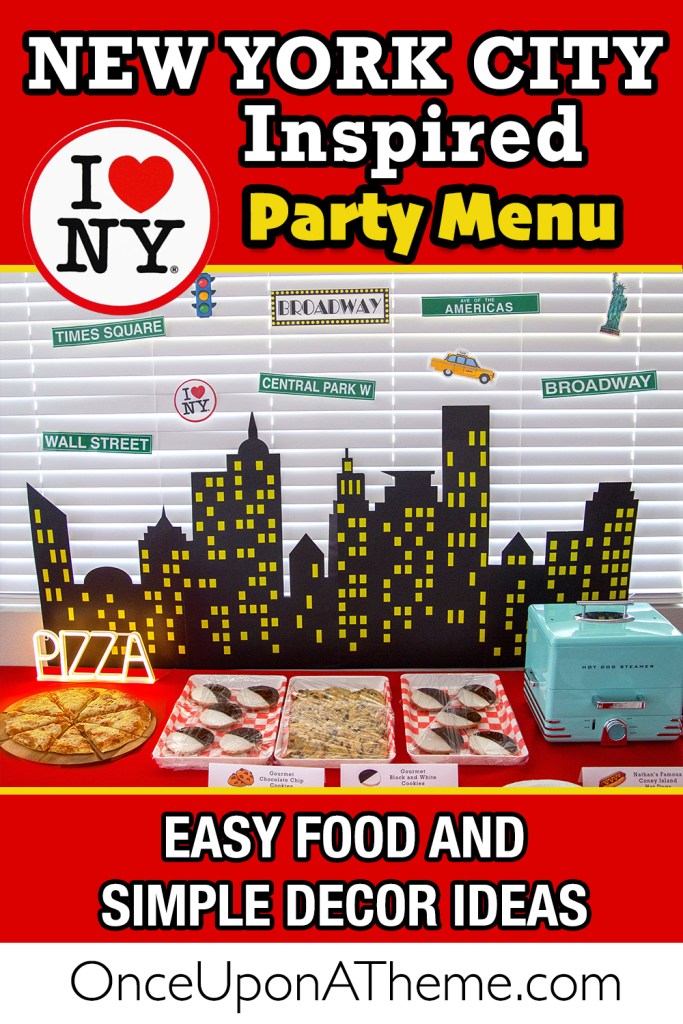
The Menu at a Glance
	•	Mains: Pizza • Nathan’s hot dogs • Build-your-own deli sandwiches
	•	Appetizer: Authentic NYC bagel bites with flavored cream cheeses
	•	Dessert: Black & white cookies + chocolate chip cookies
	•	Extras: Grab-and-go chip rack (street-cart style)
Appetizer: NYC Bagel Bites

I sent my husband to pick up authentic NYC bagels from Jeff’s Bagel Run. I sliced them into bite-size pieces and served them with a variety of cream cheeses, each labeled with a tiny handmade flag. Easy, filling, and very on-theme.

Make it simple: Pre-slice an hour before guests arrive and keep covered with plastic wrap so they stay soft.

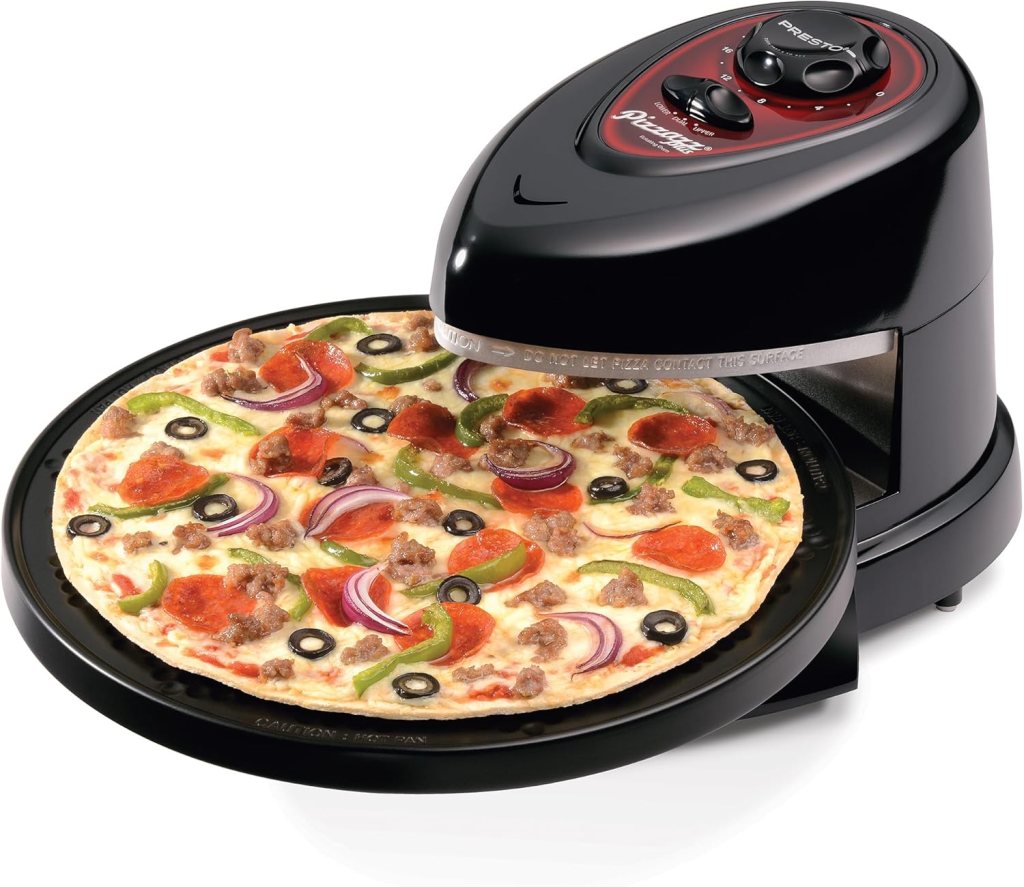
Main #1: Set-and-Forget Pizza

My MVP appliance: the Presto Pizzazz rotating pizza oven. Place a frozen pizza on the tray, set the timer, and in about 15 minutes it’s hot, crisp, and party-ready. I kept it on the counter cycling pies while I mingled—no oven babysitting.
Main #2: Nathan’s Hot Dogs

I use a countertop hot dog steamer for parties all the time. Add water beforehand; about 20 minutes before serving, load hot dogs in the drawer and buns in the top tray. It brings everything to temp and holds it perfectly so guests can grab and go. I set out paper hot dog trays for quick serving.

Street-cart vibe: An inexpensive chip rack filled with single-serve bags was a huge hit and kept crumbs off the table.

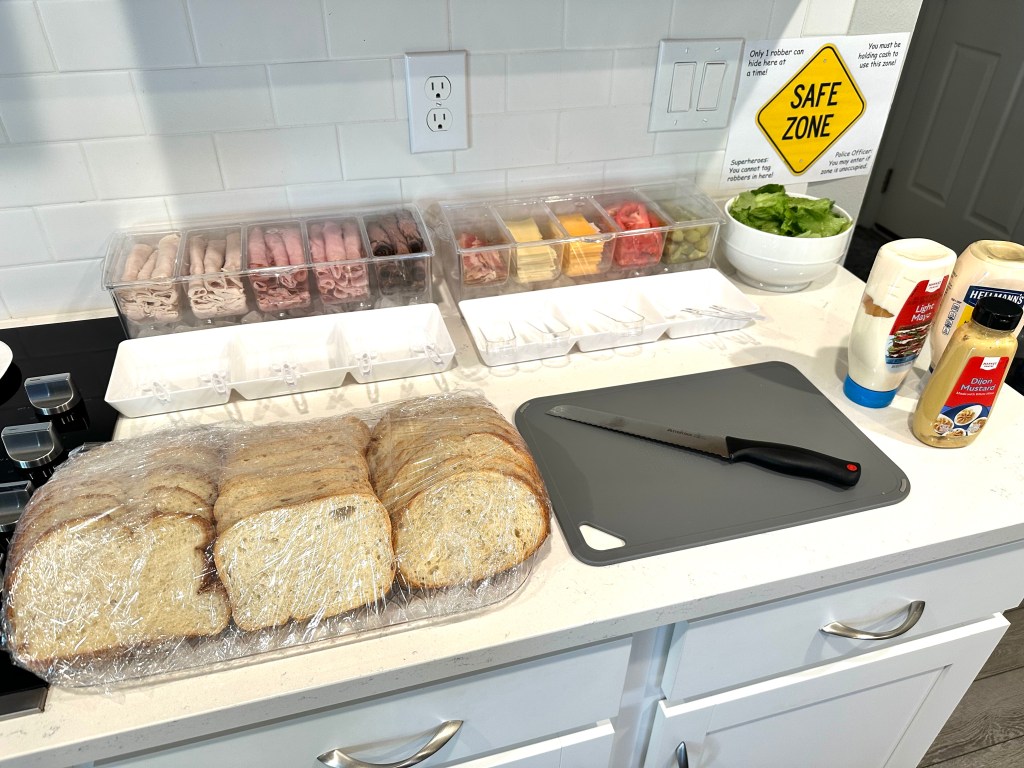
Main #3: Build-Your-Own NY Deli

I prepped a simple deli bar the night before, so party day was just a set-out-and-serve situation.

What I included
	•	Breads: 3 fresh loaves from the Publix bakery
	•	Meats: turkey, ham, roast beef, pre-cooked bacon
	•	Cheeses: swiss, cheddar
	•	Toppings: tomato slices, lettuce
	•	Condiments: mayo, mustard, and pickle spears on the side
	•	Gear: lidded condiment servers filled with ice (prepped and stored in the fridge), panini press link for hot melts, cutting board + bread knife

Set everything out at mealtime and let guests build their favorites—zero assembling for you.
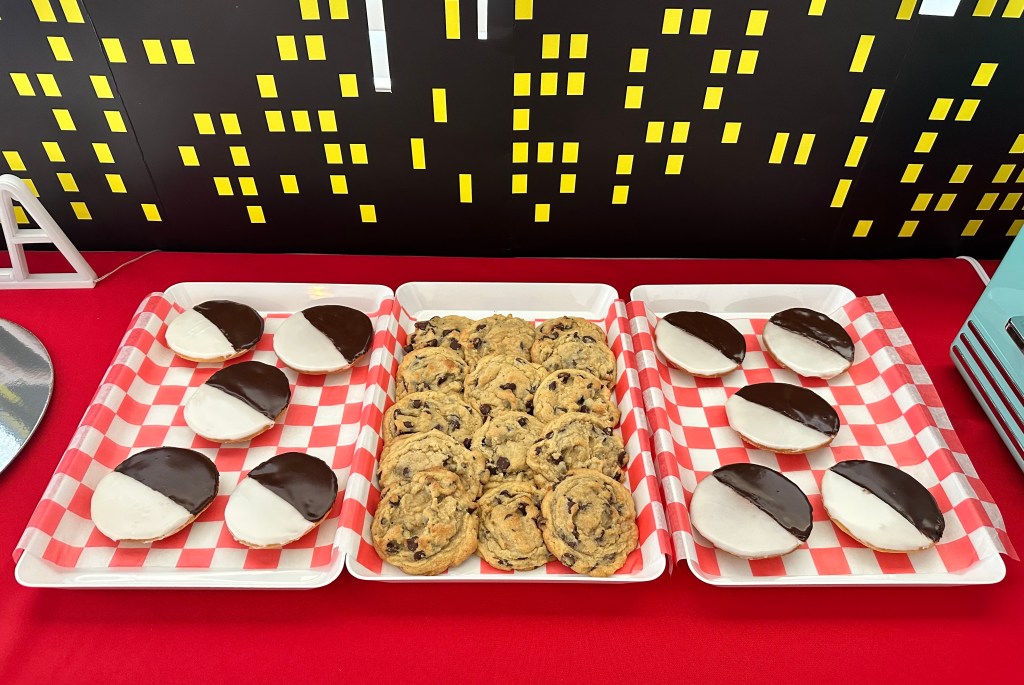
Dessert: Classic NYC Cookies

I baked two kinds ahead and plated them right before the party on serving platters lined with checkered parchment for that deli-counter look:
	•	Black & White Cookies — soft, fluffy, and light years better than the usual stale ones. I used the Preppy Kitchen recipe (with a helpful YouTube walkthrough) and they stayed fresh for days.
	•	Thick Chocolate Chip Cookies — the crowd-pleaser that disappears first.

Recipes: I’ve added both cookie recipes at the end of this post so you can bake exactly what I served.
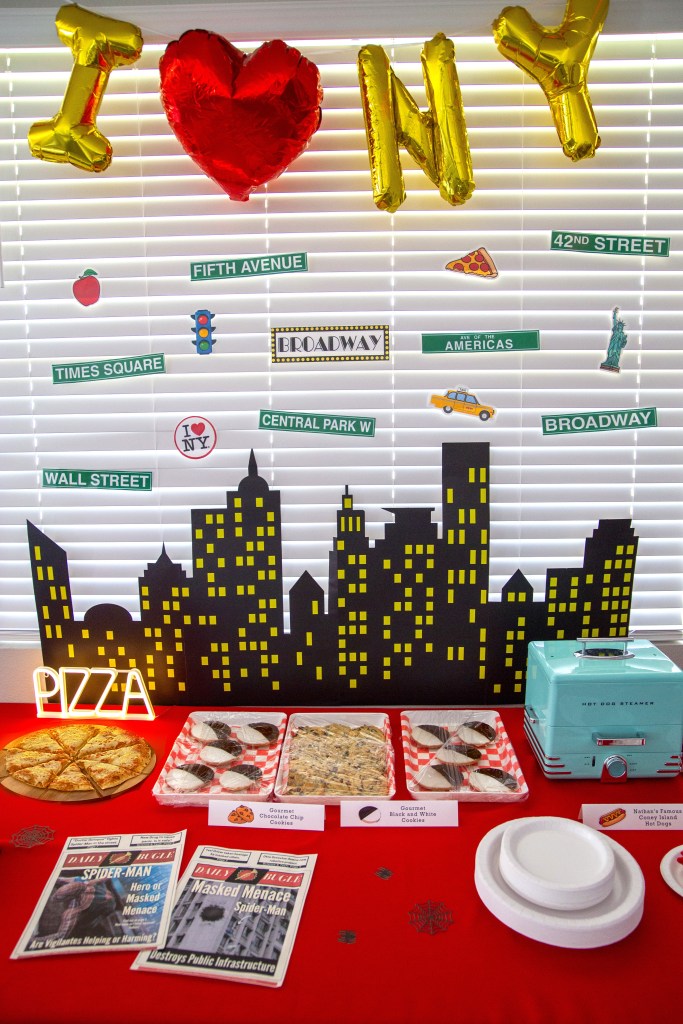
Quick NYC Décor That Sells the Theme

You don’t need much to make the theme read instantly:
	•	Cardboard NYC skyline backdrop
	•	“I ❤️ NY” formed with gold letter mylar balloons and red heart mylar balloons
	•	Printed street signs, taxis, Statue of Liberty, etc.
	•	LED PIZZA sign
	•	Optional for Spider-Man parties: Daily Bugle newspapers scattered on the table.
Host-Friendly Timeline (What to Prep When)
	•	Day Before: Slice breads, prep deli meats/cheeses/toppings in covered condiment servers; bake cookies; print labels/signs.
	•	Morning Of: Set up backdrop and table; plug in hot dog steamer (water only) and set out pizza cooker.
	•	When Guests Arrive: Set out bagel bites + cream cheese appetizer.
	•	20 Minutes Before Food: Load steamer with hot dogs and buns. Start first pizza.
	•	Meal Time: Set out deli bar, chip rack, and cookie trays. Keep pizzas cycling.
Why This Works
	•	Kid-approved classics everyone recognizes
	•	Minimal day-of cooking thanks to two small appliances
	•	Scalable for any guest count
	•	Budget-friendly and easy to recreate
Black and White Cookies
Prep Time: 20 minutes
Cook Time: 13 minutes
Cooling Time: 1 hour
Total Time: 1 hour 33 minutes
Servings: 8-10 large cookies
Author: John Kanell, Preppy Kitchen

INGREDIENTS

Cookies
	•	1 ⅓ cups all-purpose flour (160 g)
	•	½ tsp baking soda
	•	½ tsp salt
	•	6 Tbsp unsalted butter, room temperature (85 g)
	•	½ cup granulated sugar (100 g)
	•	1 large egg, room temperature
	•	2 tsp vanilla extract (10 mL)
	•	⅓ cup buttermilk (80 mL)

Icing
	•	2 cups confectioners’ sugar (240 g)
	•	2 tsp fresh lemon juice (optional)
	•	2 Tbsp water, plus more as needed
	•	1 Tbsp light corn syrup
	•	½ tsp vanilla extract
	•	3 Tbsp cocoa powder, Dutch-process preferred (18 g)

INSTRUCTIONS

	1.	Preheat oven to 350°F (175°C) and line two baking sheets with parchment paper or silicone mats.
	2.	In a medium bowl, whisk together flour, baking soda, and salt. Set aside.
	3.	In a stand mixer with paddle attachment, cream butter until smooth. Add sugar and beat on high until light and fluffy.
	4.	Mix in the egg and vanilla, scraping down the bowl as needed.
	5.	Add flour mixture and buttermilk in three alternating additions, beginning and ending with flour. Mix on low until just combined.
	6.	Drop just under ¼ cup of batter per cookie onto prepared baking sheets (no more than 5 per sheet). Leave space between cookies as they spread.
	7.	Bake 13–14 minutes, or until centers spring back lightly when touched. Cool upside-down on a wire rack (flat side up for icing).
	8.	For icing: whisk confectioners’ sugar, vanilla, lemon juice (if using), corn syrup, and water until smooth. Adjust consistency with extra water as needed.
	9.	Transfer half of icing to another bowl and whisk in cocoa powder plus a little extra water and corn syrup until glossy.
	10.	Spread vanilla icing over one half of each cookie. Once set, spread chocolate icing over the other half. Let set fully before serving.

NOTES

	•	These cookies are best fresh but stay soft for several days in an airtight container.
	•	The YouTube tutorial from Preppy Kitchen is super helpful to watch alongside baking.
	•	Tip: Use an offset spatula for clean icing lines down the center.
Chocolate Chip Cookies
Prep Time: 15 minutes
Cook Time: 10–12 minutes
Total Time: 30 minutes
Servings: About 24 cookies
INGREDIENTS
- 2 ¼ cups all-purpose flour (270g)
- 1 teaspoon baking soda
- 1 cup unsalted butter, softened (227g)
- ¾ cup packed brown sugar (150g)
- ¼ cup granulated sugar (50g)
- 1 (3.4-ounce) package instant vanilla pudding mix
- 2 large eggs
- 1 teaspoon vanilla extract
- 2 cups semisweet chocolate chips (340g)
INSTRUCTIONS
- Preheat the oven to 350°F (175°C). Line baking sheets with parchment paper or silicone mats.
- In a medium bowl, sift together flour and baking soda, then set aside.
- In a large bowl, cream together butter, brown sugar, and granulated sugar until light and fluffy. Beat in the pudding mix until blended, then stir in the eggs and vanilla.
- Gradually add the flour mixture into the wet ingredients until just incorporated. Fold in the chocolate chips.
- Drop rounded spoonfuls of dough onto the prepared baking sheets, spacing them about 2 inches apart.
- Bake for 10–12 minutes, switching racks halfway through, until edges are golden brown. Cool on baking sheets for 2 minutes, then transfer to wire racks to cool completely.
Want to see more from this Spider-Man birthday party? Check out how I transformed my den into a full superhero cityscape in my Spider-Man Party Room Transformation post. And if you’re looking for fun, action-packed ideas to keep kids entertained, don’t miss the Spider-Man Party Activities we played at this celebration!


Leave a comment